
Before reading my tutorial I recommend reading Eriance's tutorial. He gives a good explanation of vanishing points, which is something that is essential to making a good sprite.
Other than vanishing points, it's recommended that you learn how to use Photoshop, Paint.NET, or another advanced editor that supports layers. Layers are our dear good friend, and we'll be using them a lot.
1.================Getting started
The First thing you need to do is turn your monitor off and get a piece of paper. Sketch up your idea first. If you've got the idea on paper, it'll be a lot easier to work from that than it is to try to make it up as you go along. Puls, if your idea looks like crap on paper, you'll know that before you get two or three hours into pixeling it.
For this tutorial, I cheated a little and used some concept art that I found on DeviantART.
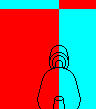
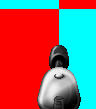
2.================Wire-frame
Get a wire-frame make. You could use a 3D modeling program to do this, but I'd only recommend that if you plan on doing a complex animation. Most things are simple enough that you can draw the wire-frame in MSpaint. You start by drawing the faces perpendicular to the ground, then drawing lines starting from the vanishing point, and down to the bottom of the screen. these lines should touch the edges of the surfaces you've drawn. Any line that is part of a feature that won't be visible gets removed. It ends up looking like this:
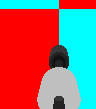
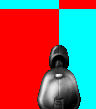
3.================Colour base
After you've got the wire-frame made, you'll need to make the colour base. This is essentially a non-textured 3D model. Again you could use modeling software, but most things aren't complicated enough to need to do that. Fill in all the surfaces of the wire-frame, and remove the black lines. This stem is probably the easiest. Don't worry too much about the colour of the surfaces at this point, colour is one of the last steps, value is important. That is to say, faces that receive light from the light source (which is usually up high and to the right) should be brighter, and faces in the shadows should be darker.
It should end up looking like this:
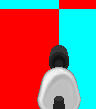
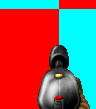
4.================Shading
I tend to use the line tool to do my shading. for highlights, I use full white, with an alpha of 32., for shadows, black with the same alpha.
Use the magic wand tool to select the surface you want to shade.
Create a new layer. I tend to use the line tool to do my shading. for highlights, I use full white, with an alpha of 32., for shadows, black with the same alpha. You can overlap your lines to make stronger highlights/shadows, and in Panit.NET you can bend your lines, which I use to make my shading conform to the shape of my weapon. Whenever you have some shading that works, create a new layer and do additional shading on that layer. If that shading looks good, merge it into the shading layer beneath it. I try to keep my highlights and shadow in separate layers as well.
The shading will end up looking something like this:
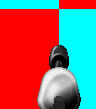
5.================Detail
Now that you have everything shaded and coloured, you need to add some smaller details.
This part really depends on what your weapon is supposed to be. On mine, I usually want them to look like there are several plates of metal being used to make the body. To add edges between two plates, or really any sort of small indent, I create a new layer, and draw black lines. I then draw white lines along one side of the black ones. THis layer's blending style gets set to "Overlay" and it's alpha is set to some value between 71 and 128. Since details are usually weapon-specific, and I can't really cover every possible thing, there's not a whole lot I can say on details.
6.================Texturing
Texturing is usually rather simple. You select the surface you want, and in a new layer, render some clouds within that selection. I try to make the darkest patches of clouds end up in the shadows of my sprite, while the lighter colours should be close to where the highlights of the weapon are. This layer's blending style should be set to "Overlay" You could use other things to give something texture, but it is more difficult, and more often than not I find that it does not work well.
7.================Colour
Duplicate the colour base, and grey-scaly the duplicate.
Merge all of your layers (except the coloured colour base) together.
The colour base has several different shades of the same colour. This was done so that you could tell where each surface would go, now we'll be using them to colour things.
You'll want to replace all the different shades of a colour with one shade of that colour. At this point you have two layers, one with colour, and one with all your shading and whatnot.
move the one with colour to the top, and set it's blending style to overlay, and merge it down.
The reason we do this is because overlaying the shading over colour does weird things to the colour, but colour over the shading does not.
Muzzle flashes are added after this step.
8.=================Done
Save your image as a png and import the png into Slade3. When in SLade, convert it to the palette you want to use the weapon in. Export it as a png, and open it with your image editor.
There will probably be some things that the palette will mess up. You could use the shading techniques from earlier to fix this, but I recommend that you do everything manually. Manual editing is harder to explain; you essentially select colours from the palette of your choice, and place them on a pixel-by-pixel basis.
At this point, you can add hands if the weapon needs hands.

I adjusted my shading and texturing a little and made a few other additions at the detail step.
I hope this helps and isn't too confusing. If you feel like I ought to elaborate more on something, or that my wording's confusing, I'd be happy to address that.